Published on Wednesday, 2017-11-15 at 11:00 UTC
Getting Started With Elixir & Docker
Learn how to build Docker containers for Elixir apps with this guide.

Lots of containers. (Original photograph by Chuttersnap/StockSnap. License: CC0
A Quick Recap on Docker & Elixir Releases
This article is best read when you already know what Docker and Elixir Releases are. If you need to refresh your memory, check out this little introduction that (curiously) explains both concepts at the same time:
Why use Docker with Elixir?
I’ve previously written about how to create Elixir Releases with Distillery. Releases are great and one of the many features to love about the Elixir/Erlang ecosystem. But the extent to which they are truly self-contained is limited.
A Release can only run on systems sufficiently similar to the build system. What does that mean? Unfortunately, that question doesn’t have a trivial answer. Most importantly, operating system and processor architecture need to match and system libraries need to be compatible. The former is why you can’t run a Release that was built on a macOS machine on Linux. The latter is why a Release that you build with Ubuntu 17.10 doesn’t work on Ubuntu 14.04: Their C standard libraries (specifically glibc) are not ABI-compatible. This means that your application might work perfectly fine on one system, but crash with an obscure error message on another.
Fortunately, there is a solution to this problem and it’s containers.
Step-by-Step Guide
Installing Docker
Before we get started, you need to have Docker installed on your development machine. Even though most of the time you’ll be running Docker in Continuous Integration (CI) and other specialized server environments, in order to get familiar with it and to follow this guide, I recommend setting it up locally.
There are multiple versions of Docker available but for our purposes Docker Community Edition (Docker CE) is more than sufficient. The Docker website has installation instructions for Windows, macOS and Linux.
If you are using Linux, you might already have Docker installed but many distributions ship with outdated versions. So I recommend installing the latest version from the Docker website to make sure there are no compatibility issues.
What’s in a Dockerfile?
Before we can create a Docker image, we need to tell Docker what this image should look like. This is what the aptly named Dockerfile is for:
A
Dockerfileis a text document that contains all the commands a user could call on the command line to assemble an image.
Here are the most important commands that we’ll be using to create our image:
-
FROMinitializes a new image based on an existing image. Alternatively,FROM scratchcan be used. -
COPYcopies files from the build context (which is usually the directory in which theDockerfileresides) into the image. -
ENVsets persistent environment variables. -
RUNexecutes one or more shell commands.
Each command in a Dockerfile creates a new layer of the final image. I don’t want to go into the internals of Docker too much but for our purpose, it is desirable to keep the number of total layers as low as possible. If you are interested in how exactly layers work, I find that this short article gives a better explanation than the official Docker documentation
Dockerfile Stages
In some cases the files you deploy on a production machine will be pretty much identical to your source code repository. Languages such as PHP and Ruby are interpreted at runtime; they don’t need to be compiled before they can be executed.
Elixir, on the other hand, is a compiled language and always requires a dedicated build phase. During the build phase you need files and programs that are not necessary in order to run the application: Mix, Git and your source code all don’t need to be available on your production system.
This is where Docker’s multi-stage builds come in handy: You can set up environments for building your application that are not going to be part of your final deployment container.
How do multi-stage builds work? Easy: Every FROM command in your Dockerfile initializes a new stage. Later stages can copy files from previous stages. The last stage becomes your final image while all other stages are discarded.
Ready, Set …
I have created a little Elixir application that does nothing but print out the current time. Let’s put this amazing work of software engineering into a Docker container!
git clone [https://github.com/wmnnd/elixir-docker-guide](https://github.com/wmnnd/elixir-docker-guide)
cd elixir-docker-guide
The Build Stage
Start by creating a file called Dockerfile in the project’s root folder.
The first step is to pick an existing image from Docker Hub for the build phase: Let’s go with Paul Schoenfelders’s awesome alpine-elixir image which ships with everything we need to compile an Elixir application.
FROM bitwalker/alpine-elixir:1.5 as build
Next, let’s copy our source code into the Docker container:
COPY . .
If you want to be more selective about what you copy from your source folder, you could also do something like this instead:
COPY rel ./rel
COPY config ./config
COPY lib ./lib
COPY priv ./priv
COPY mix.exs .
COPY mix.lock .
Being more explicit with the folders you want to copy, can be useful if you want to avoid issues with artifacts in the _build folder or previously downloaded dependencies.
Next, we want to fetch the application’s dependencies, compile it and build a Release with Distillery:
RUN export MIX_ENV=prod && \
    rm -Rf _build && \
    mix deps.get && \
    mix release
The rm -Rf _build bit is not necessary if you are only building your image in an isolated CI environment or if you have chosen the more explicit way of copying your files mentioned above.
At this point, you can already try building an image from your Dockerfile. Call the following command and you should see the application being built by Mix and Distillery — inside a Docker container:
docker build -t elixir-docker-guide .
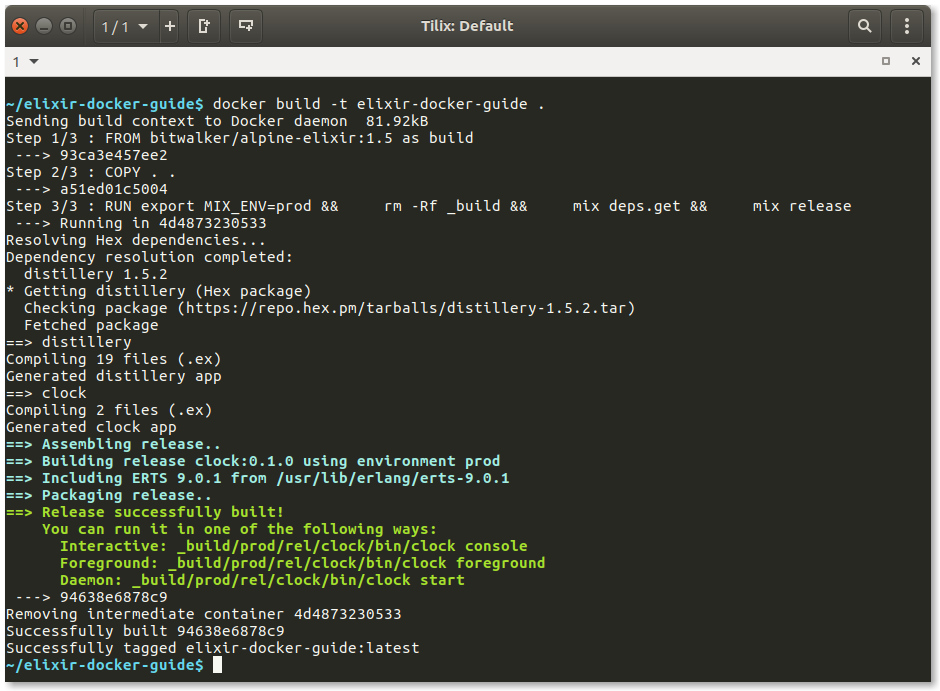
The -t parameter for docker build gives a name or tag to the newly created image. Like this, we can access it at a later point. We also need to specify the build context, i. e. the local folder from which to build the image. Since this is the current folder, we simply put . there.
Finishing the Build Stage
Distillery buries the .tar.gz archive of a Release deep in the _build folder. Since it is our goal to use the Release we’ve just built in our deployment image, let’s copy it to a more easily accessible location:
RUN APP_NAME="clock" && \
    RELEASE_DIR=`ls -d _build/prod/rel/$APP_NAME/releases/*/` && \
    mkdir /export && \
    tar -xf "$RELEASE_DIR/$APP_NAME.tar.gz" -C /export
While this snippet might seem a bit obscure at first, it’s actually pretty simple: It extracts the .tar.gz archive created by Distillery into a folder called /export .
The Deployment Stage
Now we initialize a second stage in our Dockerfile:
FROM pentacent/alpine-erlang-base:latest
The next step is to copy the compiled Release from the previous stage:
COPY /export/ .
It’s good practice to use a non-root user, even inside of a container. This is why we make Docker switch to the default user (which has already been created in alpine-erlang-base).
USER default
Finally, all we need to do is specify an ENTRYPOINT and a CMD for our image. ENTRYPOINT defines the application that is started when creating a container from our image; CMD specifies the default arguments for that application:
ENTRYPOINT ["/opt/app/bin/clock"]
CMD ["foreground"]
Let’s give it a try! Build and run the application:
docker build -t elixir-docker-guide .
docker run -t elixir-docker-guide
That wasn’t too hard, was it?
The Full Recipe
At this point you might want to “dockerize” your own application. For this purpose, I have created this annotated Dockerfile that you can use as a boilerplate. Just make sure to replace both instances of MY_APP_NAME with your actual application name:
#===========
#Build Stage
#===========
FROM bitwalker/alpine-elixir:1.5 as build
#Copy the source folder into the Docker image
COPY . .
#Install dependencies and build Release
RUN export MIX_ENV=prod && \
rm -Rf _build && \
mix deps.get && \
mix release
#Extract Release archive to /rel for copying in next stage
RUN APP_NAME="MY_APP_NAME" && \
RELEASE_DIR=`ls -d _build/prod/rel/$APP_NAME/releases/*/` && \
mkdir /export && \
tar -xf "$RELEASE_DIR/$APP_NAME.tar.gz" -C /export
#================
#Deployment Stage
#================
FROM pentacent/alpine-erlang-base:latest
#Set environment variables and expose port
EXPOSE 4000
ENV REPLACE_OS_VARS=true \
PORT=4000
#Copy and extract .tar.gz Release file from the previous stage
COPY /export/ .
#Change user
USER default
#Set default entrypoint and command
ENTRYPOINT ["/opt/app/bin/MY_APP_NAME"]
CMD ["foreground"]
From Here On Out
Phoenix
You can also use this method for creating Docker images of Phoenix applications. Just make sure to include the steps to build and digest your assets in the build phase. With the default Brunch asset pipeline, this would look something like this:
ENV MIX_ENV=prod
RUN apk update && \
    apk add -u musl musl-dev musl-utils nodejs-npm build-base
RUN mix deps.get
RUN mix compile
RUN cd assets && \
    npm install && \
    node ./node_modules/brunch/bin/brunch b -p && \
    cd .. && \
    mix phx.digest
RUN mix release
If you are using a more elaborate asset pipeline or if you want to take better advantage of Docker’s caching capabilities, you can even make this a dedicated Docker stage.
Umbrella Applications
There isn’t really anything special you need to do to build Docker images from umbrella applications. Distillery already takes care of bundling everything up nicely. If you’re using Phoenix as one of your child apps, just remember that you need to adjust the paths in the above example for building your assets.
What About the Base Image?
You might have noticed that I suggested using my very own pentacent/alpine-erlang-base image as the base of the production image. You could also use bitwalker/alpine-erlang but alpine-erlang-base gives you the smallest image size possible. I will write about choosing and creating a base image for Elixir deployment in a future article.
Credit Where Credit is Due
I’d like to thank those who helped me create this guide:
-
Paul Schoenfelder for creating alpine-erlang on which inspired my
alpine-erlang-baseimage and for his helpful feedback. -
Cees de Groot and Thomas Athanas for their feedback and suggestions.